Install instruNet software Before installing the physical i2x0/i60x device.
instruNet Software ≥ v3.7 (which includes iW+) is compatible with 32bit and 64bit Windows XpSp3/Vs/7/8/10 computers.
For more details on what is compatible with what, see
instrunet.com/a/disc.
Software is installed either from an instruNet CD or from instrunet.com.
If working with the CD, insert the
CD into the computer and run its instruNet_Setup.exe file
by double-clicking on the file.
If installing from the internet, select the
Download menu at the top of
instrunet.com,
download the instruNet_Setup.exe file,
and then run it by double-clicking on its icon.
This is the same file that is on the CD.
Installation typically requires < 10 minutes. If the computer asks you if you want to trust someone, please say yes.
If you get an error while installing on Windows XP SP3 or Windows Vista,
then cancel the install, install
Windows Installer v4.5, and then install instruNet.
The instruNet_Setup.exe software installs a copy of the instruNet.com website on the end user's local hard disk, which means one can access it without attaching the computer to the internet. The website contains all documentation, and is provided instead of a hard copy user's manual. To access it, click on the "installing instruNet" desktop icon; or select START, PROGRAMS, instruNet, and awebpage. A copy of hardware drivers are placed at " \ Program Files .. \ instrunet \ drivers \ ..".
If you purchased the optional instruNet World PLUS (iW+) software,
then enable it via the instructions at instrunet.com/a/plus, or via the hard copy "instruNet World+ (iW+) License" document included with iW+.
B) Install instruNet HARDWARE
After installing instruNet Software, as described above, install instruNet Hardware:
If working with i240 or i60x USB hardware, make sure you are on a 32bit or 64bit Windows ≥ XP Sp3 computer. Alternatively, if working with an older i200/i230, make sure you are on 32bit Windows XpSp3/Vs/7/8 (not ≥ 10). To view your
instruNet version, run the instruNet World software (i.e. START / Programs / instruNet / instruNet World), and
select About... under
the Help menu.
Turn power OFF to all instruNet i100 and i4xx Card Cage devices (e.g. disconnect 110/220V power from i312 power supply);
turn power OFF to equipment connected to your instruNet hardware; and touch bare metal on your
computer metal frame to discharge your personal static electricity. It is not necessary to power OFF your computer at this time.
If working with i4xx Cards, build your i4xx Card Cages and
install their i4xx Cards as needed. In Summary:
One i41x computer interface card must be placed into slot #1 (which is the left most slot).
If you are working with analog inputs, you need at least one i43x a/d card in each card cage.
To install an i4xx card: Remove blank panel via two slotted jackscrews at top & bottom, replace blank with actual i4xx card and secure with two original jackscrews. For more details,
see instrunet.com/a/i4xx.
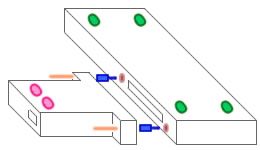
Card cages with 5 or more slots require side-by-side assembly of
two to four i400's (e.g. four i400's creates a 16slot card cage).
One attaches i400's side-by-side by removing the side 62pin connector covers,
pressing the i400's together, and then securing the seam with
four flat head 4-40 bolts (included with each i400). For details on building card cages
with 5 or more slots, see instrunet.com/a/i4aa.
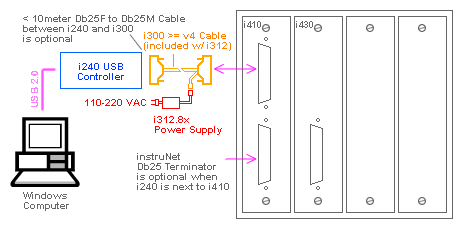
An i312 power supply and i300 power adaptor cable
is required between the i2x0 controller and the first i100/i4xx device.
Optionally, one can place a ≤ 10m (30ft) Db25 cable between the i240 and the i300.
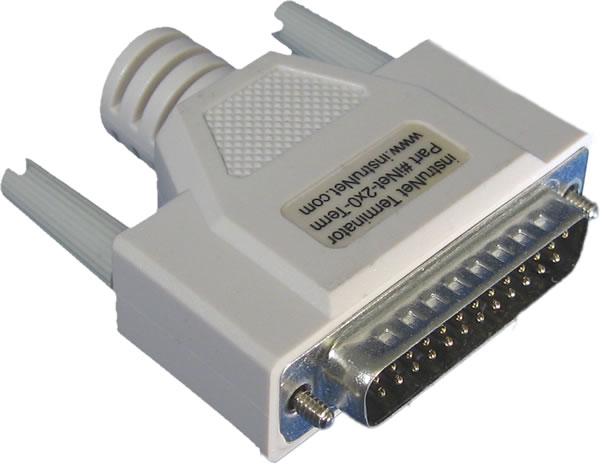
The Db25 Terminator
at the end of the network is not required if the distance between the i240 and the last device is less than 5 meters (15ft).
The i240 USB controller is powered from its Db25 connector, not from its USB 4pin connector. This means
that the computer will not see the i240 until the Db25 i312 power is applied. A red light on the i410 and a green light on the i312 illuminate when these devices are receive power. Alternatively, i60x devices are powered from the USB cable.
The i240 USB controller needs an i300 power adaptor cable that was manufactured after January of 2010 (#iNet-300 v4).
Shown below is a typical i240 USB i4xx Card Cage system where power is inserted into
the network before the first instruNet device via the
i300 power adaptor cable.
If you are working with i240 or i60x USB hardware:
The i240/i60x communicates with a computer via High Speed USB 2.0 (480M bits/sec).
USB 1.0 and Full Speed USB 2.0 (12M bits/sec) are not sufficient; whereas USB 3.0 is compatible.
To avoid confusion, it is recommended that one connect the i240/i60x directly to a USB connector on the computer itself (no intermediate hub). External USB hard disks and USB flash memory also need fast transfer speeds; therefore it is recommended that they be attached directly
to the computer as well.
If working with multiple i240/i60x USB controllers, one can attach up to
eight i240/i60x to a preferably USB ≥ 3.0 hub (2.0 works too),
and then attach that hub to the computer.
If using a USB ≥ 3.0 hub, make sure you have a USB ≥ 3.0 cable between hub and computer. Do not use thin USB cables to i60x since they may not support 400mA current to device -- possibly causing permanent damage to cable or degradation of i60x performance (the included cable is sufficient).
When you initially installed the instruNet_Setup.exe file, as described previously,
the i240/i60x USB driver file ("inet_usb_installer.inf") was placed onto your computer
and registered with your operating system. Then, later, when you physically attach the i240/i60x hardware, the computer
automatically matches that file to the new device and installs the hardware automatically.
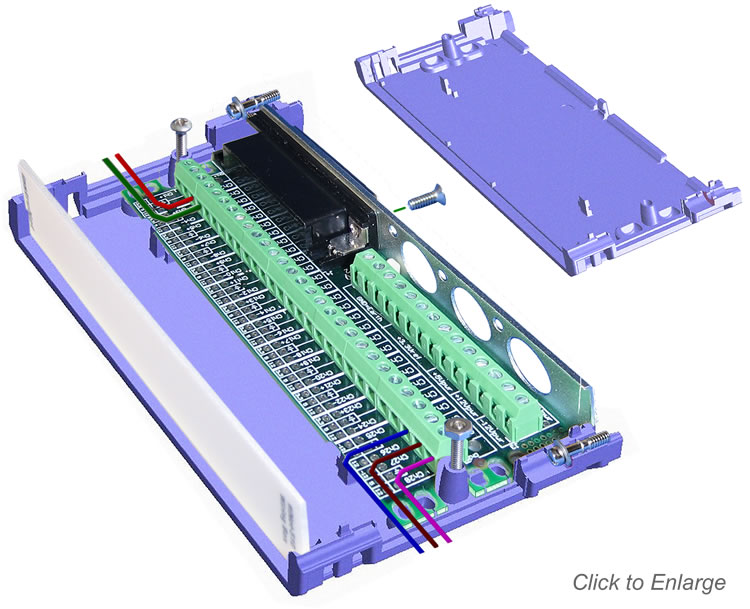
To open or close
i51x
Wiring Box: visit 3 bolts, shown to the right with
red arrows.
If you are working with
i100 or i4xx hardware, build your instruNet network:
In instruNet lingo, a "Device" is either an i100 box or an i4xx Card cage;
and a "Controller" is any i2x0 product (i200 PCI, i230 PCMCIA, or i240 USB).
All Devices are compatible with all Controllers.
If the instruNet Db25 network is longer than 5 meters (15ft),
one must place an instruNet Db25 Terminator
at the end of the network.
Make sure there are no Db25 cables (e.g. 3 meters) between the i300 and the i41x/i100 due to
limitations
with transmitting power on small db25 cable wires.
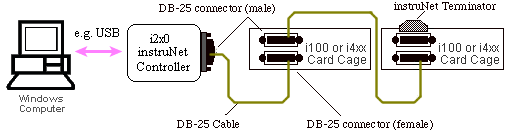
Shown below is a system with more than one i100/i4xx device. Notice how devices are daisy-chained together
via Db25 cables; with a Db25 instruNet Terminator at the end of the network.
If working with i60x hardware: Disconnect i60x from computer, attach sensors to
i51x
wiring box or Hd44 Connector, attach i51x
or Hd44 to i60x, and then attach i60x to computer via USB cable.
For details, see the
i60x Installation Guide.
i60x hardware receives power from the USB cable and internally contains one "instruNet Controller"
and one "instruNet Device".
To attach
i60x to i51x Wiring Box: Remove i51x top cover
as described above,
affix 4 small rubber feet
to bottom of i51x to reduce sliding on table,
affix 2 larger rubber feet to bottom of i60x,
remove one flat-head philips bolt next to i51x Hd44 connector,
install 2 jacknuts via
lock washers next to i51x Hd44 connector,
connect i60x to i51x, and tighten 2 thumbscrews.
For details, see the
i60x Installation Guide.
Feet & jacknuts are included with each i60x product inside the
i60x Hardware Kit.
When wiring sensors, remove power by unplugging the i60x USB cable.
If working with i100/i2x0/i4xx hardware: turn computer power OFF, make sure Db25 thumbscrews are tight, attach i2x0 controller to computer with power OFF, attach network devices to i2x0 controller via Db25 Cable, turn computer power ON, and then turn ON items attached to instruNet.
If
the computer shows a dialog box that says
it "Found New Hardware"
and it needs an .inf driver file for the i2x0/i60x USB hardware,
one must use the BROWSE button to navigate
to one of the directories listed below.
If you are on a 32bit Computer, you must navigate to "Program Files"
instead of "Program Files (x86)".
i240/i60x USB Driver For 32 or 64bit Windows ≥ XP Sp3 Program Files (x86)\ instruNet \ Drivers \ iNet USB Driver \
i230 PCMCIA Driver For 32bit Windows Xp/Vs/7/8 (not Win ≥ 10, not 64bit) Program Files (x86)\ instruNet \ Drivers \ PCMCIA Win 2k-Xp Driver \
i200 PCI Driver For 32bit Windows Xp/Vs/7/8 (not Win ≥ 10, not 64bit) Program Files (x86)\ instruNet \ Drivers \ PCI Win Nt-2k-Xp Driver \
Never click "Search Internet for New Driver", never "Manually Check for Drivers on Windows Update", and never use Windows Update to locate a new driver. If working with i240/i60x USB hardware, do not navigate to ".. \ Drivers \ iNet USB Driver \ amd64 \ " and instead navigate to the location of the .inf file, which is ".. \ Drivers \ iNet USB Driver \ ".
i2x0/i60x hardware should appear in the Windows Device Manager under "Data-Acquisition Cards". Also, if instruNet ever
appears here with a yellow mark next to its icon; then one
needs to "Update Driver" and browse to one of the above directories.
One should only need to attach a driver once per installation.
To open the Device Manager, type "device manager"
into the START search field; or right-click on the "Computer" icon,
select Properties, and select Device Manager.
To verify that your system is working properly,
see instrunet.com/a/ver, and if you have any problems of any kind,
see instrunet.com/trouble.
For details on driver files installed onto your computer,
see instrunet.com/f.
 Hidden
Hidden
Hidden
Hidden
Hidden
Hidden
Hidden