 Hidden
Hidden
Hidden
Hidden
Hidden
Hidden
Hidden
SETTING UP DASYLAB FOR INSTRUNET To use instruNet with DASYLab please do the following: 1. Install instruNet hardware and software onto your computer. Make sure you are working with iNet32.dll version ≥ 3.1.6, which is required for DasyLab . To see what version is installed, run instruNet World software and select ABOUT in the HELP menu. To get the latest DLL, please click here. 2. Run instruNet World to ensure that your instruNet hardware is working correctly. 3. Install DASYLab v7.0 or later onto your computer using the DASYLab CD or download. Note that DASYLab Version 13 was published in 2015 and is referred to as "DASYLab 13"; whereas DASYLab Version 14 was published in 2016 and is alternatively referred to as "DASYLab 2016".
DASYLab ≥ v12 (2011)
After you enter your serial number, click on the PACKAGES tab and enable the instruNet software, as shown below. Also, if you do not do this during installation, you can do it later by selecting START > DASYLAB > CONFIGURATOR via your computer's Start menu. 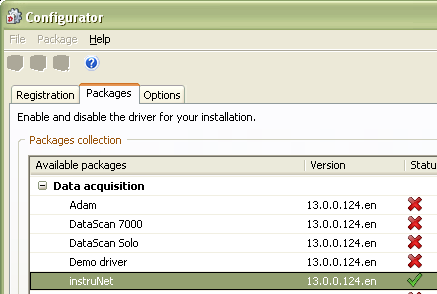
DASYLab ≥ v11 (2010) The instruNet driver within DASYLab is part of the standard driver set, which means that any DASYLab serial number issued after July 2010 will enabled the instruNet interface within DASYLab. DASYLab < v11, Issued Prior July 2010 The DASYLab serial number contains a bit that enables the instruNet driver within DASYLab. In other words, you need a version of DASYLab (i.e. a DASYLab serial number) that supports instruNet. If this is not the case, please contact your DASYLab supplier. If you had previously installed instruNet with a serial number that does not invoke the instruNet interface, you will need to reinstall or update your installation, as described here. 4a. If you are working with DASYLab ≤ v13 and have more than 8 instruNet channels, the channel settings might not save properly in the dasylab .dsb worksheet file. To fix this, place instrunet-driver-for-dasylab "Inet.dll" v13.0.1.183 into file position "..program files (x86) \ DasyLab ... \ Inet.dll". This "Inet.dll" for DASYLAB ≤ v13 is different from the "Inet.dll" for DASYLAB ≥ v14; therefore, if you are on ≥ v14, do not download this v13 dll. To download the latest ≤ v13 file, click here. 4b. If you are working with DASYLab 2016 (version 14) build < 508 then every other digitized point will be incorrect. To fix this: exit Dasylab if running, download a new english (en) or german (de) DLP file from here (i.e. "instrunet.14.0.0.508.en.dlp" or "instrunet.14.0.0.508.de.dlp") and place file on your desktop, click "START menu / All Programs / DASYLab 2016 / Configurator 2016", select "Import Package" under "Package" menu, select a dlp file, click "Packages" tab, unselect "instruNet 14.0.0.__" if you see it and it is selected, select "instruNet 14.0.0.508", exit Configurator, run DasyLab, and then look for instruNet under "modules / input-output / instrunet / input". This issue applies to the very specific case of DL 2016 build < 508. 5. Restart your computer and launch DASYLab.
DASYLab ≥ v8
When you run DASYLab ≥ v8 after the installation is complete, you will see instruNet icons, as shown here. These icons talk to instruNet hardware. Other analog and digital i/o icons support other hardware, and do not work with instruNet, so make sure you use instruNet icons when working with instruNet hardware. If you do not see "instruNet" icons, stop and contact DASYLab tech support and include your serial number. You will be issued a new serial number, and then you will need to reinstall DASYLab with this number, as described here DASYLab < v8 Select DEMO as the main driver (or any other driver) and select instruNet as the secondary driver ("components"). Verify that the instruNet option is listed in the summary installation dialog (you may need to scroll down to see it). DASYLab installation copies the correct files to your DASYLab directory and modifies the DASYLab.ini file. Make sure you have "..program files \ DasyLab \ iNet_e.dll" version ≥1.11 (modified ≥11/19/98) on your computer. This DasyLab-instruNet interface DLL is not compatible w/ DasyLab ≤ 4.0. The "iNet_e.dll" and "iNet_d.dll" filenames were changed to "iNet.dll" in later versions of DASYLab. 6.
You can simultaneously collect data from instruNet, traditional data acquisition cards, serial devices and IEEE-488 devices. The instruNet hardware is controlled and sampled independently of other types of inputs. The slowest instruNet
sample rate is 1 point every 30secs. To go slower, use the signal averaging icon or the separate icon. 7. Setting up your input or output channels is easy. Create an instruNet Input or Output module and open the Properties dialog by double-clicking on the module icon. Click on the Select Channel button to select the Network, Device, Module and Channel. Click on the Set Up Channel button to specify the type of sensor and other channel-specific options. Add channels by clicking on the + button. You must setup each channel individually. 8. The instruNet channel configuration is saved with the worksheet. Modifications using instruNet World or with other worksheets do not affect saved worksheets. 9. Do not run instruNet World at the same time that you run DASYLab. Each requires exclusive access to the installed instruNet hardware. Close instruNet World before running DASYLab. 10. To simulate instruNet hardware when none is installed, click here. For examples of DASYLab/instruNet worksheets, click here.
|